
Properly optimizing your blog posts can be the difference between being on page 1 and page 100 of the Google search results.
No joke.
Because even though Google’s algorithms are getting better at understanding the context of content on the web (via advances with NLP), they still need help.
And if you don’t give Google the help it needs, you could spend a TON of time writing great content that never ranks.
Ain’t nobody got time for that.
I’ve seen firsthand over the 5+ years I’ve worked in the industry that simple tweaks with headings and keyword placements can immediately increase or decrease rankings.
That’s why I’ve put together this handy blog post optimization list you can use to ensure you do everything you can to rank your content.
The Simple 9-Step On-Page SEO Process for Blog Posts
Step #1: Optimize Your URL
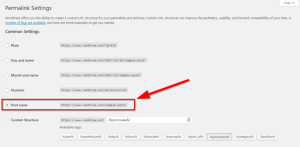
If you use WordPress, the default permalink settings are horrendous.
But you can change them quickly (if you haven’t already) by heading to settings in your WordPress dashboard and selecting permalinks.
Then, select “post name” format and hit save.
Sweet!
Now, head to your post in WordPress. Click the “edit” button by your URL and change it ONLY to your target keyword (with each word separated by dashes).
Your URL should look something like this:
This doesn’t seem like much, but keeping your URL concise and keyword-driven can provide immediate benefits.
Another nice tip you may employ is trying to keep your URLs as short as possible, preferably less than 60 characters.
For example, the title of this post is “Top 10 Things To Include in Your Affiliate Terms and Conditions” and the word “top” is omitted from the URL.
Keeping a word like “top” is impactful for titles (when appropriate) but unnecessary in a URL most of the time.
The best practice is to keep your URLs under 80 characters.
Step #2: Add Your Main Keyword to Your Title
Your exact keyword needs to be in your H1. Period.
But, at the same time, your title needs to be unique and compelling.
When someone comes across it in the Google SERPs it has to immediately catch their attention.
And finding the balance between these two is often challenging.
That’s why I always recommend early in the blog-writing process that you come up with 3-5 title ideas with your exact keyword.
Your keyword should be the “set in stone” part of your title, but you can (and should) still put on your copywriting hat and see how you can make the words around your keyword compelling.
I like to use phrases like these to spice up a keyword-driven title:
- [Keyword]: The Shocking Truth
- [Keyword]: The Proven #-Step Guide
- # [Keyword] That [Benefit]
- [Keyword]: Everything You Need to Know
Step #3: Add Your Main Keyword to Your SEO Title and Meta Description
Your SEO title is similar to your H1. The only difference is it’s the one you “formally” submit to Google (via a tool like Yoast, for example)
There are all kinds of debates raging around whether your H1 and SEO Title should be different, but the key thing to keep in mind with your SEO Title is this:
It needs to be written specifically to catch someone’s eye as they scan the SERPs.
Your normal H1 needs to appeal to anyone who might see the post.
This could be drastically different or almost identical—it’ll vary depending on the context.
The same goes for your meta description. Write this with your copywriter hat on and come up with a few sentences that would entice someone scrolling the SERPs to click on your result.
Taking the search intent behind your keyword into account is incredibly helpful here.
In terms of optimization, you need your exact keyword in both the SEO title and meta description.
Similar to your H1, there are tons of ways to find the balance between having your keywords in there and making them compelling.
One thing I love to do with meta descriptions is ask a question in the first sentence and allude to the answer in the second.
For example, if my keyword is “how to write a blog post”, I might write:
“Wondering how to write a blog post that ranks in Google? Here’s what most articles you’ve read thus far won’t tell you.
Creating just a little bit of curiosity and cognitive dissonance can go a long way to increasing your CTR.
Step #4: Add Secondary Keywords Throughout Your Content
This is vital.
The more relevant secondary keywords you add to your blog post, the more keywords you can rank for.
The easiest way to figure out what other keywords you can rank for in the same article is by searching your target keyword and copy/pasting competitors into a tool like the Ahrefs site explorer.
Make note of any keywords those already ranking articles are also showing up for in positions 1-10 and find a way to add them to your post as well.
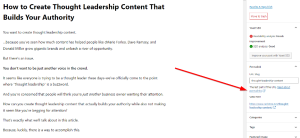
Step #5: Optimize Your Headings
Add broad keywords to your H2 headings and long-tail keywords to H3-H5 headings.
Example:

Notice the highlighted keywords.
Each broad keyword has its own section with an H3 heading, and long-tail keywords are included in H4 headings.
Structuring your post like this helps you grab tons of long-tail keywords with one post.
Step #6: Make Sure Your Main Keyword Appears Early and Late In Your Content
Find a way to include your primary keyword in both your introduction and conclusion.
If it appears within the first and last few hundred words, this helps Google know what your post is about.
When in doubt, don’t worry about stuffing keywords here if it means sacrificing the reading experience.
Step #7: Add Keywords to Your Image Alt Tags
Alt tags describe what an image is about.
If you include your keywords in your alt tags, your images can rank in Google Images—which means more traffic.
You want to include your main keyword in at least 1 image Alt Text, and other primary keywords in the rest.
Don’t just include your keyword, make it look natural.
Create Alt Texts that include:
- The section/post title
- A short description of the image itself
- Or a short description of the role the image plays in the post.
Step #8: Add Internal Resources
Internal linking gives your other posts an easy ranking boost.
All you have to do is go through your blog post and:
- Look for places to link to your other content. If there aren’t many obvious and organic link opportunities, you can add links with phrases like, “Want to know more about ___? Click here for my ultimate guide.”
- Use anchor text to add an internal link to a relevant post. Always look to embed your link in a keyword/phrase (but don’t use the same phrase over and over in every post…switch it up).
This is a MUST and it isn’t hard.
Step #9: Add External Resources
Believe it or not, adding a few links to other trustworthy resources in your post will actually help you.
When you do this, Google associates you (in part) with a reputable site. This is a legit ranking signal.
Obviously don’t link to an article you’re directly competing with—look for interesting/helpful articles on one of your subtopics.
Just 2-3 per post (if it’s 1,000+ words) works great.
Getting Blog Post Optimization Right Can Lead to Big Dividends
Sometimes things are so simple that it seems like they shouldn’t work.
That’s the case here.
This process isn’t hard and simply works time and time again.
Remember to go through these steps with every blog you create. As mundane as it sounds, it can pay huge dividends for years to come.